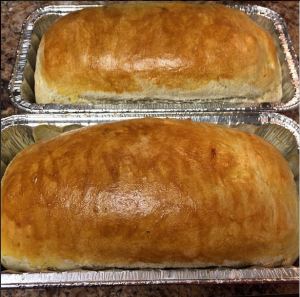
After my success at Banana Nut Bread, I decided to make the leap and give yeast bread a try… Scary, right? Not really! I was actually surprised at how well my first exploits turned out, considering I am still new to the “bread from scratch” world. I thought I would post a nice walkthrough of what I did to obtain these yummy yeast loaves. Honestly, it was not difficult and it was really relaxing!
First off, you want to get your yeast started. You will need:
– 2 cups of warm water (between 100 and 110 degrees)
– 1 cup of sugar
-1 packet of activated yeast
Start off by combining your warm water and sugar until the sugar is completely dissolved. This will get your yeasties going and “feed” them, so to speak. This is the most important step of the process, so pay attention! Once the sugar is dissolved, you will add your packet of activated yeast and stir it until combined. Now… leave it alone! I let mine sit for 6 minutes and it turned out perfect. You will want to look for signs that your yeast is active, like small bubbles forming on the surface, billowing yeast, or yeast moving in circles in the bowl. If you get any of these, you are good to move on to the next step!
Now, you will need:
-1 cup of bread flour (I cheated and used all purpose flour)
-1 tablespoon of salt
-5 more cups of bread flour
To your yeast mix, you will add your first cup of flour. This will act as a barrier between the yeast and the salt. Stir this in well with a standing mixer. Once the first cup of flour is mixed in, add your salt while still mixing, then add in the rest of the flour in small increments. Combine everything well!
Once all of the ingredients are well combined, turn off your mixer and move your dough to a floured surface and kneed! This was my absolute favorite part. It was so zen-like! You will want to mash, bash, and kneed your dough until it is no longer sticky. Try to aim for at least 5 minutes of kneeding, but I went much longer than that.
After you finish kneeding your dough, form it into a ball and place it in a floured bowl and cover the bowl with a damp rag. Place the whole thing in a warm space, like on your oven, and leave it for up to two hours to rise. Your dough will finish rising once it has doubled in size. You can also test by poking the dough with your finger. If the indention stays, your dough has finished rising.
I gave my dough another round of kneeding with flour before splitting it into two to make two separate loaves. Once the loaves were formed, I let the dough rise for a second time in the loaf pans. This time, my loaves only needed a 30 minute rise before they passed the indention test.
You will want to bake your loaves at 350 degrees for approx. 40 minutes. I pulled my loaves out at 30 minutes and brushed the tops with an egg wash to give them nice brown tops. You can test your loaves to see if they are done by tapping on the top. If you loaves sound hollow, they are fully cooked!
Enjoy some tasty homemade breads! I loved eating these yeast breads with some of my soups!